aka – please be careful of asking me something
Recently a friend sent me an email asking how to start a series of machines in Azure in a certain order. These particular machines were all used for labs and demos – some of them needed to be started and running before others. This is probably something that a lot of people can relate to; imagine needing to start domain controllers before bringing up SQL servers before bringing up ConfigMgr servers before starting demo client machines.. You get the idea.
So, even though we got something for my friend up and running, I decided to go ahead and build a repo for this. The idea right now is that this repo will start machines in order, but I will expand it later to also stop them. Eventually I will expand it to other resources that have a start/stop action. Thanks a lot, Shaun.
The basics of the current repo are 2 files – start-azurelab.ps1 and config.json. Start-AzureLab performs the actual heavy lifting, but the important piece is really config.json. Let’s examine the basic one:
{
"TenantId": "fffffff-5555-4444-fake-tenantid",
"subscriptions": [
{
"subscription_name": "Pay-As-You-Go",
"resource_groups": [
{
"resource_group_name": "AzureLabStartup001",
"data": {
"virtual_machines": [
{
"vm_name": "Server001",
"wait":false,
"delay_after_start": "1"
},
{
"vm_name": "Server002",
"wait":false,
"delay_after_start": "2"
}
]
}
}
]
}
]
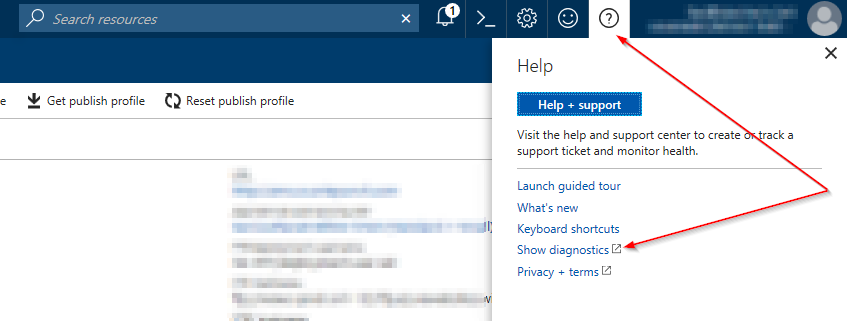
}The first thing you see is the ‘tenantid’. You will want to replace this with your personal tenant id from Azure. To find your tenant id, click help and show diagnostics:
Next, you can see the subscription name. If you are familiar with JSON, you can also see that you can enter multiple subscriptions – more on this later. Enter your subscription name (not ID).
Next, you can see the Resource_Group_Name. Again, you can have multiple resource groups, but in this simple example there is only one. Put in your specific resource group name. Now we get down to the meat of the config.
"data": {
         "virtual_machines": [
          {
                "vm_name": "Server001",
                "wait":false,
                "delay_after_start": "1"
           },
           {
                 "vm_name": "Server002",
                 "wait":false,
                 "delay_after_start": "2"
            }
     ]
}
This is where we put in the VM names. Place them in the order you want them to start. The two other properties have special meaning – “wait” and “delay_after_start”. Let’s look at “wait”.
When you start an Azure VM with start-azvm, there is a property you specify that tells the cmdlet to either start the VM and keep checking until the machine is running, or start the VM and immediately return back to the terminal. If you set the “wait” property in this config to ‘false’, then when that VM is started the script will immediately return back to the terminal and process the next instruction. This is important when dealing with machines that take a bit to start – i.e. large Windows servers.
Now – combine the “wait” property with the “delay_after_start” property, and you have capability to really customize your lab start ups. For example, maybe you have a domain controller, a DNS server , and a SQL server in your lab, plus a bunch of client machines. You want the DC to come up first, and probably want to wait 20-30 seconds after it’s running to make sure your DC services are all up and running. Same with the DNS and SQL boxes, but maybe you don’t need to wait so long after the box is running. The client machines, though – you don’t need to wait at all, and you might set the delay to 0 or 1. Just get them up and running and be done with it.
So now we can completely control how our lab starts, but say you have multiple resource groups or multiple subscriptions to deal with. The JSON can be configured to allow for both! In the github repo, there are 2 additional examples – config-multigroup.json and config-multisub.json. A fully baked JSON might look like this:
{
    "TenantId": "ff744de5-59a0-4b5b-a181-54d5efbb088b",
    "subscriptions": [
        {
            "subscription_name": "Pay-As-You-Go",
            "resource_groups": [
                {
                    "resource_group_name": "AzureLabStartup001",
                    "data": {
                        "virtual_machines": [
                            {
                                "vm_name": "Server001",
                                "wait":true,
                                "delay_after_start": "1"
                            },
                            {
                                "vm_name": "Server002",
                                "wait":false,
                                "delay_after_start": "2"
                            }
                        ]
                    }
                },
                {
                    "resource_group_name": "AzureLabStartup002",
                    "data": {
                        "virtual_machines": [
                            {
                                "vm_name": "Server001",
                                "wait":true,
                                "delay_after_start": "1"
                            },
                            {
                                "vm_name": "Server002",
                                "wait":true,
                                "delay_after_start": "2"
                            }
                        ]
                    }
                }
            ]
        },
        {
            "subscription_name": "SubID2",
            "resource_groups": [
                {
                    "resource_group_name": "AzureLabStartup001",
                    "data": {
                        "virtual_machines": [
                            {
                                "vm_name": "Server001",
                                "wait":true,
                                "delay_after_start": "1"
                            },
                            {
                                "vm_name": "Server002",
                                "wait":true,
                                "delay_after_start": "2"
                            }
                        ]
                    }
                },
                {
                    "resource_group_name": "AzureLabStartup002",
                    "data": {
                        "virtual_machines": [
                            {
                                "vm_name": "Server001",
                                "wait":true,
                                "delay_after_start": "1"
                            },
                            {
                                "vm_name": "Server002",
                                "wait":true,
                                "delay_after_start": "2"
                            }
                        ]
                    }
                }
            ]
        }
    ]
}
So there you have it – hope you enjoy the repo, and keep checking back because I will be updating it to add more features and improve the actual code. Hope this helps!