Run _Anything_ with Flow. PowerShell Triggers

Want to start PowerShell commands from a Tweet? Yeah you do, and you didn’t even know you wanted to.

Earlier this month, a great Flow of the Week was posted that highlighted the ability to use a .net filesystemwatcher to kick off local processes. This sparked an idea – I think we can expand on this and basically run anything we want. Here’s how:

First, let’s start with the Connected Gateway. The link above goes into a bit of detail on how to configure the connection. Nothing special there.
Second, on the Connected Gateway, run this PowerShell script:

$FileSystemWatcher = New-Object System.IO.FileSystemWatcher
$FileSystemWatcher.path = "C:\temp\WatchMe"
$FileSystemWatcher.Filter = "Flow.txt"
$FileSystemWatcher.EnableRaisingEvents = $true
 
Register-ObjectEvent $FileSystemWatcher "Changed" -Action {
$content =  get-content C:\temp\WatchMe\Flow.txt |select-object -last 1
powershell.exe $content
}

This script sets up a FileSystemWatcher on the C:\temp\WatchMe\Flow.txt file. The watcher will only perform an action if the file is changed. There are several options for the “Changed” parameter – Created, Deleted, Renamed, Error, etc… Once created, the watcher will look at the last line of the c:\temp\WatchMe\Flow.txt file, and launch a PowerShell process that takes that last line as the input.

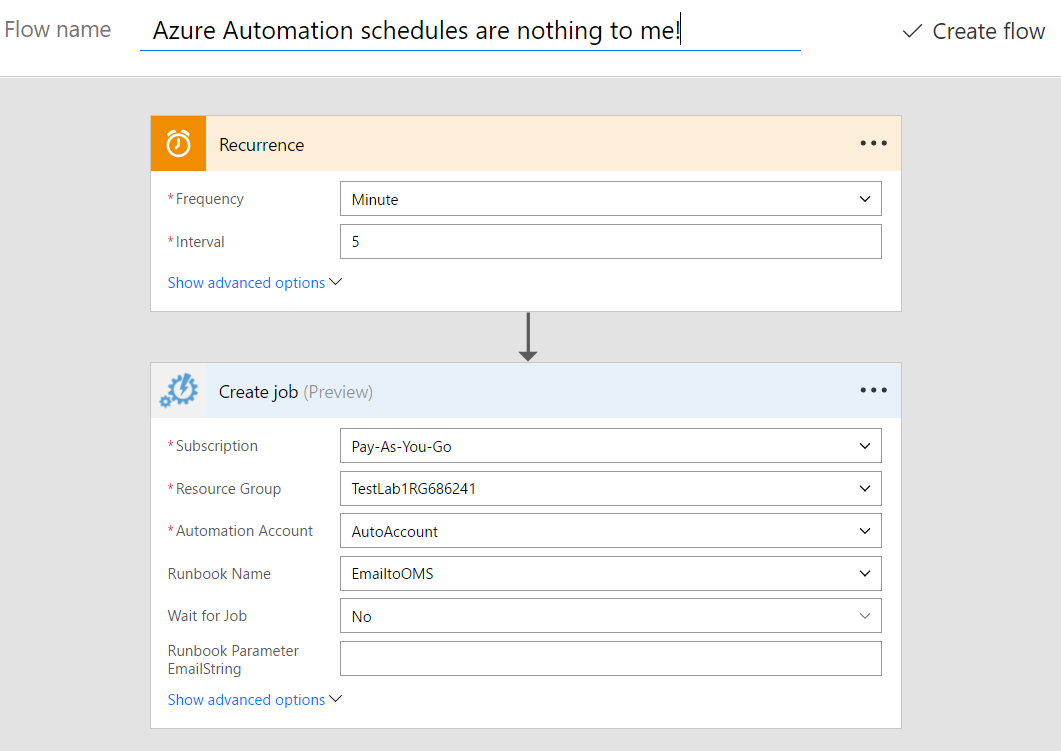
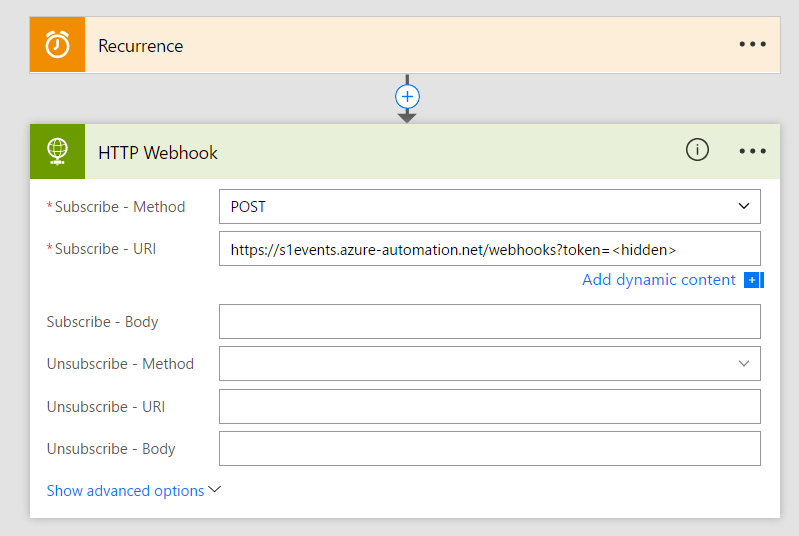
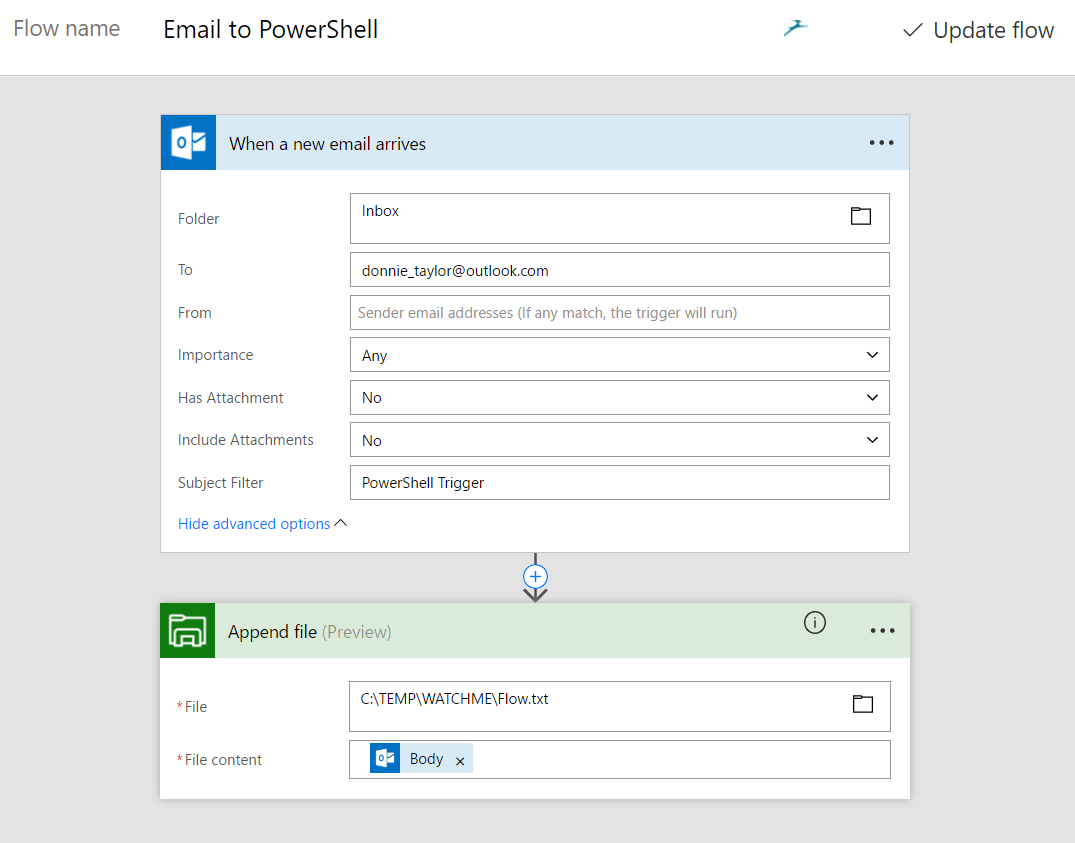
Third – This is the best part. Since we have a FileSystemWatcher, and that watcher is reading the last line of the C:\temp\WatchMe\Flow.txt file and kicking that process off, all we have to do is append a line to that file to start a PowerShell session. Flow has a built-in connection for FileSystem. You can see where this is going. Create a new Flow, and add an input action – I am fond of the Outlook.com Email Arrives action. Supply a suitable trigger in the subject, and add the ‘Append File’ action from the FileSystem service. Here is how mine is configured:

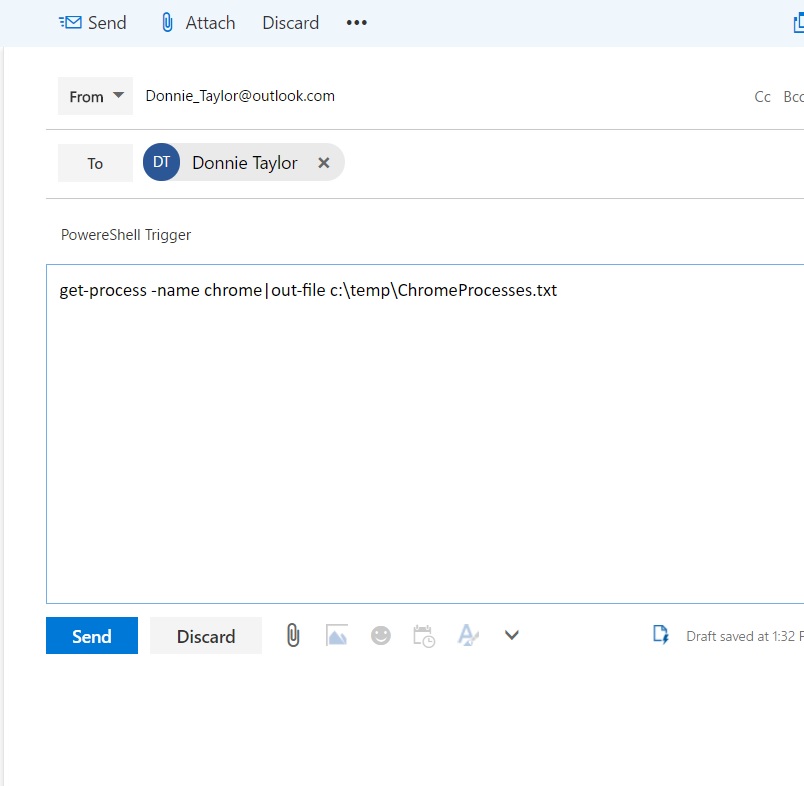
The only catch with this particular setup is that the body of the email needs to be in plain text – Windows 10 Mail app, for example, will not send in plain text. The body of the mail is the PowerShell command we want to run. For example, maybe we want PowerShell to get a list of processes that have a certain name, and dump those to a text file for parsing later. Simply send an email that has the body of “get-process -name chrome|out-file c:\temp\ChromeProcesses.txt”. Here is what that results in:
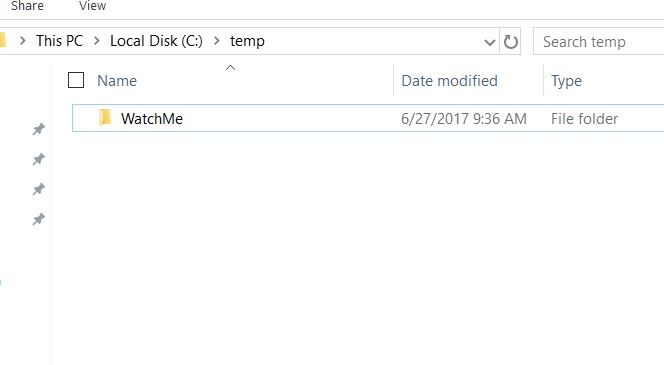
Before we send the email:

The Email:

After a few minutes – an new folder appears!:

The contents of the text file:

Handles  NPM(K)    PM(K)      WS(K)     CPU(s)     Id  SI ProcessName                                                  
-------  ------    -----      -----     ------     --  -- -----------                                                  
   1956      97   131588     191648     694.98    728   1 chrome                                                       
    249      22    34268      43356       1.63   4264   1 chrome                                                       
    381      81   307592     331312     145.16   6080   1 chrome                                                       
    149      12     2140      10076       0.05   7936   1 chrome                                                       
    632      86   277900     557484     974.00   9972   1 chrome                                                       
    431      31   147956     159404     182.11  10056   1 chrome                                                       
    219      12     2132       9608       0.08  11636   1 chrome                                                       
    283      50   135932     141512      98.05  12224   1 chrome                                                       
    396      54   133912     297432      18.58  12472   1 chrome                                                       
    253      46   107348     106752      50.13  13276   1 chrome                                                       
    381      48   114452     128836     242.89  14328   1 chrome                                                       

Think about what you could do with this – Perhaps you want to do an Invoke-WebRequest every time a RSS Feed updates. Maybe start a set of diagnostic commands when an item is added to Sharepoint. Kick off actions with a Tweet. If you want full scripts to run instead of commands, change the Action section of the FileSystemWatcher to “PowerShell.exe -file $content”. Easy as pie.

Azure Runbook for Posting to the OMS API

For MMSMOA 2017, I created an Azure Runbook that could post to the OMS API. Well, it’s more than a month later, but I finally got around to making a post around it. I’m going to skip the basics of creating a runbook, but if you need a primer, I suggest starting here.

Let’s start with the runbook itself. Here is a decent template that I modified from the OMS API documentation. This template takes an input string, parses the string into 3 different fields, and sends those fields over to OMS. Here’s the runbook:

Param
(
    [Parameter (Mandatory= $true)]
    [string] $InputString
)


$CustomerID = Get-AutomationVariable -Name "CustomerID"
$SharedKey = Get-AutomationVariable -Name "SharedKey"
write-output $customerId
write-output $SharedKey
$date = (get-date).AddHours(-1)

# Specify the name of the record type that you'll be creating
$LogType = "MyRecordType"

# Specify a field with the created time for the records
$TimeStampField = "DateValue"

# Create the function to create the authorization signature
Function Build-Signature ($customerId, $sharedKey, $date, $contentLength, $method, $contentType, $resource)
{
    $xHeaders = "x-ms-date:" + $date
    $stringToHash = $method + "`n" + $contentLength + "`n" + $contentType + "`n" + $xHeaders + "`n" + $resource

    $bytesToHash = [Text.Encoding]::UTF8.GetBytes($stringToHash)
    $keyBytes = [Convert]::FromBase64String($sharedKey)

    $sha256 = New-Object System.Security.Cryptography.HMACSHA256
    $sha256.Key = $keyBytes
    $calculatedHash = $sha256.ComputeHash($bytesToHash)
    $encodedHash = [Convert]::ToBase64String($calculatedHash)
    $authorization = 'SharedKey {0}:{1}' -f $customerId,$encodedHash
    return $authorization
}


# Create the function to create and post the request
Function Post-OMSData($customerId, $sharedKey, $body, $logType)
{
    $method = "POST"
    $contentType = "application/json"
    $resource = "/api/logs"
    $rfc1123date = [DateTime]::UtcNow.ToString("r")
    $contentLength = $body.Length
    $signature = Build-Signature `
        -customerId $customerId `
        -sharedKey $sharedKey `
        -date $rfc1123date `
        -contentLength $contentLength `
        -fileName $fileName `
        -method $method `
        -contentType $contentType `
        -resource $resource
    $uri = "https://" + $customerId + ".ods.opinsights.azure.com" + $resource + "?api-version=2016-04-01"

    $headers = @{
        "Authorization" = $signature;
        "Log-Type" = $logType;
        "x-ms-date" = $rfc1123date;
        "time-generated-field" = $TimeStampField;
    }

    $response = Invoke-WebRequest -Uri $uri -Method $method -ContentType $contentType -Headers $headers -Body $body -UseBasicParsing
    $WhatISent = "Invoke-WebRequest -Uri $uri -Method $method -ContentType $contentType -Headers $headers -Body $body -UseBasicParsing"
    write-output $WhatISent
    return $response.StatusCode
}

# Submit the data to the API endpoint

$ComputerName = $InputString.split(';')[0]
$AlertName = $InputString.split(';')[1]
$AlertValue = $InputString.split(';')[2]

# Craft JSON
$json = @"
[{  "StringValue": "$AlertName",
    "Computer": "$computername",
    "NumberValue": "$AlertValue",
    "BooleanValue": true,
    "DateValue": "$date",
    "GUIDValue": "9909ED01-A74C-4874-8ABF-D2678E3AE23D"
}]
"@

Post-OMSData -customerId $customerId -sharedKey $sharedKey -body ([System.Text.Encoding]::UTF8.GetBytes($json)) -logType $logType  

There are a couple of things to note with this runbook – first, the date it will post into OMS will be Central Standard Time. If you want to change to another timezone, change the $date = (get-date).AddHours(-1) line (aligning to EST). Second, this script has output which you can remove. The output will only show up in the output section in Azure Automation, which makes it handy for troubleshooting. The third thing you might want to change is the $LogType = “MyRecordType” line. This is the name that OMS will give the log (with one caveat mentioned below).

So, create your runbook in Azure Automation, and give it a test. You will be prompted for the InputString. In my example here, I will use the input string of “Blog Test;Critical;This is a test of an Azure Runbook that calls the OMS HTTP API”

Give it a minute or so, and you are rewarded with this:

Notice the “_CL” at the end of my log name? Notice the “_S” at the end of the fields? OMS does that automatically – CL for custom log, S for string (or whatever data type you happen to pass).

There you have it – runbooks that post to OMS. Add a webbook to the Runbook, and call it from Flow. Send an email to an inbox, have Flow trigger the Runbook with some of the email data, and suddenly you have the ability to send emails and have that data appear in OMS.

OMS and Flow Integration – Best Friends Forever

The alert actions in Microsoft OMS are great, but they can be a bit limited. Sending emails can be boring, ignored, or end up in the spam folder. Runbooks are awesome, but can take some time to setup. What if you want to use a simple Microsoft Flow to perform other actions? Flow is fast, simple, reliable, and mobile ready. Here is how to make OMS and Flow best friends – and make you look like a rockstar!

Go to https://requestb.in/ and select “Create a RequestBin”
Copy the Bin URL. You will need this in a minute.
Open OMS and head to the alert you want to make awesome (Overview – Settings – Alerts).
Turn on the Webhook action, and paste the Requestb.in url into the “WebHook URL” field.
Check the box to turn on the “Include Custon JSON Payload”. Paste this json into the field below the checkbox:

{“AlertRuleName”:”#alertrulename”,
“AlertThresholdOperator”:”#thresholdoperator”,
“AlertThresholdValue”:”#thresholdvalue”,
“LinkToSearchResults”:”#linktosearchresults”,
“ResultCount”:”#searchresultcount”,
“SearchIntervalEndtimeUtc”:”#searchintervalendtimeutc”,
“SearchIntervalInSeconds”:”#searchinterval”,
“SearchIntervalStartTimeUtc”:”#searchintervalstarttimeutc”,
“searchquery”:”#searchquery”,
“workspace”:”#workspaceid”,
“IncludeSearchResults”:true
}

Note: You might want to remove the “searchquery” json pair – the alert queries that have special characters can really cause havoc with the webhook.
Hit “Test WebHook”. If you get an error, remove the searchquery section out of the json and try again. If it occurs again, shoot me an email and I will be glad to help.
Go back to RequestB.in and refresh your page. You should see something like this:

Copy out the “Raw Body” section.
Open Flow, and create a new Flow (My Flows, Create from Blank)
For the Trigger – pick “Request/Response – Request”. When you click on the trigger, it will open the Flow for editing.
Click on “Use sample payload to generate schema”, and paste in the data you got from RequestB.in. Click “Done”. Flow has now setup of the JSON schema that the rest of your Flow will use.
Add another other Flow action like you normally would – For example, you might want to add these alerts to a Sharepoint list, or perhaps put them in a SQL database for archiving. The fields that are available to the actions that follow the Request trigger depend on the fields that were sent by the alert – I suggest that you play around with Threshold vs Metric alerts so you can see how they post to Flow.
One last step – when you save the Flow, make sure you go into the “Request” trigger and copy the URL. You will want to paste that url in the OMS alert Webhook URL (remove the requestb.in url). Now, when the alert triggers, it will pass the data to Flow rather than RequestB.in.

Once you have the alerts coming to Flow, the possibilities are endless – want to see those Alerts on your phone? Get PowerApps and in 5 minutes you can point it at the SQL database you are using to store the alerts. Want a mobile notification? Piece of cake with Flow. Hell, maybe you want to Tweet those alerts for some reason – Go for it! I won’t tell you not to.

Flow to the Rescue! Overcoming Azure Automation Scheduling Limitations

Azure Automation – the 800lb gorilla in the room. If you can think of a way to accomplish a task, more than likely Azure Automation can do it. Combining the ease of use of PowerShell, the sheer power of Azure, and the multitude of integrations available, you can build enterprise worthy automation runbooks quickly and easily.

It’s a no-brainer.
Until it isn’t.

One of the most frustrating limitations of Azure Automation is the scheduling tool. Sure – you can setup one-time and reoccurring schedules with ease, but what if you need something to run often – say every 10 or 15 minutes? Unfortunately, when you go to set a schedule like that, you are greeted with this:

That means you can’t set a single schedule shorter than an hour. Sure, you can set multiple schedules – you would need 4 if you want to run every 15 minutes. What if you want something to run every 5? Are you going to create 20 schedules? Of course not! This is where Microsoft Flow comes to the rescue.

There are 2 ways to trigger an Azure Automation job from Flow (probably more, if you dig deep), so let’s start with the simplest one. If you have a connection from Flow to Azure Automation already, then this simple Flow will start an Azure Automation Runbook:

Boom – no need for 20 schedules here! This simple Flow probably just saved you an hour of clicking and checking. But what if you don’t have a connection to Azure Automation already established? Perhaps you want to run a Runbook that isn’t in your subscription? It’s still pretty easy. The first step is to obtain the webhook URL for the Runbook. Start by access your Azure Automation Runbook – make sure it has focus. In the left navigation pane you should see a link for ‘Webhooks’. Click that to shift focus to the Webhook listing page. Click the ‘Add Webhook’ button at the top of the main pane. From here on out, it’s pretty straight forward. Give your webhook a name, set the expiration date for the webhook, and it your Runbook has any parameters you want the webhook to pass, specify those name.

IMPORTANT – Make sure you copy the URL before clicking OK. Finding that URL later is like pulling teeth – you might be able to do it, but it will be painful.

When you are satisfied with the settings, and have copied the URL, click ‘OK’.

No that you have your webhook created in Azure Automation, it time to setup flow. Luckily for you, it couldn’t be easier!

That’s it! No more Azure Automation Scheduling limitations! Run those runbooks as often as you like!